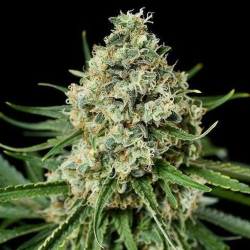
Growing cannabis sounds simple on paper: seed, light, water, patience. In practice, between germination and a healthy harvest lies a long list of pitfalls that even experienced growers fall into. Most failed grows are not caused by bad luck or weak genetics — they are caused by a handful of common mistakes that are entirely avoidable with the right knowledge.
This guide covers the ten most common cannabis growing mistakes. For each one you get a short explanation, how to spot it on the plant, how to prevent it, how to recover if it has already happened, and a pro-tip for those wanting to go beyond the basics.
The approach draws on cannabis cultivation literature — including the meta-analysis by Backer et al. (2019) in Frontiers in Plant Science, which systematically breaks down the factors behind cannabis yield, and Caplan et al. (2017) on nutrient and water management. For step-by-step coverage, we have previously published comprehensive guides on indoor cannabis growing and outdoor cannabis growing.

Mistake 1: Overwatering — the most underestimated killer
The first mistake on this list is also the most common: giving too much water. Roots need oxygen as much as they need water. A waterlogged substrate fills the air spaces between roots, cuts off the oxygen supply and leads to root rot — a process that can ruin a healthy young plant in a few days.
How to spot it
Symptoms misleadingly resemble drought damage: limp, drooping leaves and yellowing that usually begins from the bottom. The difference is in the substrate — under overwatering it is actually wet. Other signs: slow growth, a dull or grey leaf colour, and in advanced cases a fowl smell from the growing pot.
How to prevent it
The fingertip test is the simplest measure: push your finger 2 to 3 centimetres into the substrate. Feels dry, water. Feels moist, wait. For higher precision: weigh the pot before and after watering and use weight as your indicator. Fabric pots and perforated plastic pots drain far better than solid containers and make overwatering almost impossible.
How to fix it
Stop watering immediately. Move the plant to a well-ventilated space so the substrate dries faster. In extreme cases — when you see brown rotten roots or smell mould — the plant has to be transplanted into fresh, dry medium, with affected roots trimmed. The plant temporarily loses growth speed but often recovers surprisingly quickly.
Pro-tip: Start in small pots and transplant to larger sizes as the plant grows. A small root system in a much larger pot holds moisture longer than the plant can absorb — a hidden cause of overwatering even among experienced growers.
Mistake 2: Ignoring or mis-setting pH
The pH of your water and nutrient solution determines whether the plant can absorb nutrients at all. Outside a narrow range, root chemistry becomes blocked — a phenomenon known as nutrient lockout — and you can keep adding nutrients without the plant doing anything with them. The symptoms look like deficiencies, which tempts many growers to add more nutrients and make the situation worse.
The correct pH ranges
- Soil: pH 6.0 - 6.8 (sweet spot around 6.3 - 6.5)
- Coco: pH 5.8 - 6.2
- Hydroponics: pH 5.5 - 6.1
How to spot a pH problem
Yellowing between leaf veins, purple-brown spots, curling leaf edges and slow growth despite "sufficient" nutrients are classic symptoms of nutrient lockout from pH drift. Magnesium or iron deficiency almost always traces back to pH drift, not to actual shortage in the medium.
How to prevent it
Invest in a good digital pH meter and calibrate it monthly. Measure both incoming water and run-off (what comes out the bottom of the pot). Large pH differences between in and out water mean substrate drift you need to correct with pH-down or pH-up.
How to fix it
Flush the substrate with pH-correct water (3 to 4 times the pot volume) to wash out built-up salts and stranded minerals. After the flush you resume nutrients at the correct pH, usually in a lighter mix to avoid overloading the plant again.
Pro-tip: Alongside the thermometer, the pH meter is the most important sensor in a grow space. A cheap pH strip is unreliable; a calibrated digital meter with 0.1 accuracy is a one-time purchase that serves ten harvests.
Mistake 3: Wrong light intensity — too much or too little
Cannabis is a light-hungry plant naturally adapted to tropical and subtropical regions. In an indoor setup that translates to specific light requirements that most beginners under- or overestimate. Too little light gives long thin plants that do not flower productively (stretching); too much light or too close gives light burn — bleached leaf tips that do not recover.
Light numbers that matter
- Veg phase (vegetative): 18 hours light per day, PPFD 400-600 μmol/m²/s
- Flowering phase: 12 hours light per day, PPFD 700-1000 μmol/m²/s
- DLI target (total daily light): 25-40 mol/m²/day in flower
How to spot it
Stretching shows as long "spaghetti" stems with large gaps between leaf nodes. Light burn appears as pale or yellow-white patches on the top leaves and flowers, often directly under the lamp, with curling edges.
How to prevent it
For LEDs, the general rule is: minimum 35-50 cm distance above the canopy for modern high-power panels (follow the manufacturer's spec). For HPS lamps: 45-60 cm minimum due to heat output. A cheap PAR meter or even a free PPFD app on your phone helps with correct setup.
How to fix it
Increase lamp distance or dim the panel immediately. Burned leaves do not recover, but the plant will produce new growth once the light is correctly set. Stretching within a phase is irreversible — consider LST (Low Stress Training) to bend the plant horizontally and equalise canopy height.
Pro-tip: Backer et al. (2019) found that light quantity is the second-most-important factor explaining final yield — only genetics scores higher. Investing in a quality LED with adjustable intensity is, over the long run, almost always more profitable than growing cheaper in an under-lit space.
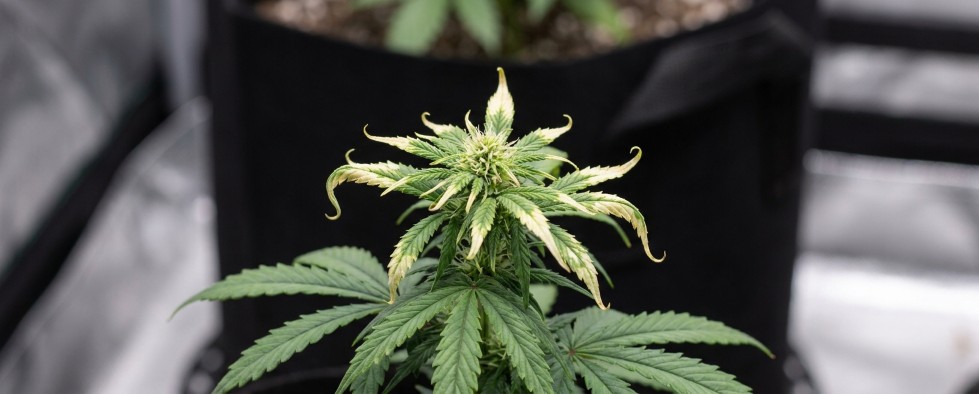
Mistake 4: Overfeeding — too much nutrients (nute burn)

The temptation to give "a little extra to be sure" is strong. Cannabis, however, is not a heavy feeder like tomatoes or peppers; it is sensitive to high salt concentrations in the root zone. The result is nutrient burn — brown, scorched leaf tips and, in severe overdose, complete leaf death.
EC numbers for reference
- Seedling / clone: EC 0.4 - 0.8
- Early veg: EC 0.8 - 1.2
- Late veg / early flower: EC 1.4 - 1.8
- Mid flower: EC 1.8 - 2.2
- Late flower: EC 1.4 - 1.8 (tapering)
How to spot it
Classic symptom: brown, scorched leaf tips ("claws") that work inward from the tips. Leaves curl upward and feel hard, brittle. It differs from pH lockout in that the damage is sharply bordered at the leaf edge rather than patchy.
How to prevent it
Always start at 50% of the manufacturer's recommended dose and build up slowly while watching the plant. Measure your nutrient solution with an EC meter and stay within the ranges above per phase. Caplan et al. (2017) documented that cannabis reaches an optimum around EC 2.0 and clearly underperforms at higher values.
How to fix it
Flush immediately: run pH-correct clean water through the medium until the run-off EC roughly matches what you put in. Then resume nutrients at half-strength and build up carefully. Leaf damage stays, but growth typically resumes within five to seven days.
Mistake 5: Poor ventilation and air circulation
Still air is the enemy of cannabis. It promotes mould growth (especially grey mould — Botrytis) during flowering, it impedes transpiration so the plant overheats, and it produces weak stems that later collapse under their own bud weight. Ventilation is not a luxury — it is one of the fundamental systems of a grow space.
The ventilation foundation
- Extraction: carbon filter + duct fan providing complete air exchange every 1-3 minutes
- Intake: sufficient fresh air supply (passive or active)
- Circulation: one or more oscillating fans inside the grow space for air movement between plants
How to spot it
Mould spots — white, grey or black powder on leaves or flowers — often appear in dark corners of the grow space. Limp or excessively thin stems on otherwise healthy plants signal lack of "stress training" from air movement. High temperatures that do not drop despite extraction indicate insufficient capacity.
How to prevent it
Position your oscillating fan so airflow moves through, not over, the canopy. Adjust extraction speed to the heat output of your lamps (modern LED produces less heat than HPS, so less extraction is possible). Preventively hang a small fan low in the tent — particularly in late flower, good air movement below the plant is critical against mould.
How to fix it
At early-stage mould: immediately cut away affected parts with sterilised shears (sterilise between cuts), improve air circulation directly and lower humidity. A severe mould infection in late flower almost always costs a major share of the harvest. Prevention here is far more effective than cure.
Mistake 6: Wrong temperature and RH (not understanding VPD)
Temperature and relative humidity (RH) are not independent — they interact through a quantity called Vapor Pressure Deficit (VPD). VPD describes how strongly the air "pulls" water out of the plant. Too low VPD means stalled transpiration and mould risk; too high VPD means stressed, thirsty plants that close their stomata and stop photosynthesising optimally.
Target values per phase
- Seedling / clone: VPD 0.4 - 0.8 kPa (22-25°C / 65-75% RH)
- Early veg: VPD 0.8 - 1.1 kPa (23-27°C / 55-65% RH)
- Late veg / early flower: VPD 1.0 - 1.4 kPa (23-26°C / 50-60% RH)
- Late flower: VPD 1.2 - 1.6 kPa (20-24°C / 40-50% RH)
How to spot it
At low VPD (too cold, too humid): slow growth, glossy wet leaves, mould spots. At high VPD (too warm, too dry): leaves curling upward ("taco leaves"), stress-red stems, dry "stressed" plants.
How to prevent it
A digital thermo-hygrometer with logging is a cheap investment that pays off enormously. A simple humidifier or dehumidifier compensates for seasonal and daylight fluctuations. For precision: download a VPD chart app or print one out and pin it in the grow space.
How to fix it
Acutely: raise or lower RH with a humidifier/dehumidifier to come back into the target range. Then adjust your lighting and ventilation to align temperature. The plant recovers to normal transpiration within 12 to 24 hours if the stress was brief.
Pro-tip: Many growers focus on humidity alone and ignore temperature. But VPD is a function of both — a 2°C rise automatically lowers the required RH by about 5%. Think in pairs, not in standalone values.
Mistake 7: Harvesting too early or too late — ignoring trichomes
The harvest moment is perhaps the most important decision of the whole grow. Harvesting too early gives an immature product with lower cannabinoid concentration; too late means the plant starts breaking down trichomes and the profile shifts. The catch: the ideal moment differs per variety and cannot be determined by calendar days alone — you have to assess trichomes visually.
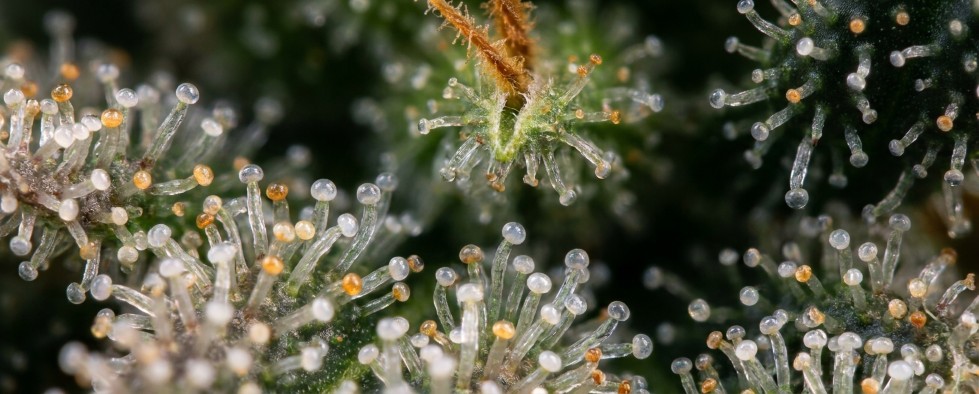
The three trichome stages
- Clear: transparent, glass-like — not yet mature, cannabinoids not at peak
- Milky: cloudy white — peak THC, the "classic" harvest window
- Amber: amber-brown — THC starts breaking down to CBN; desired for a more "couchlock" profile
How to spot the right moment
A small, cheap USB microscope (60-100x magnification) or a loupe app on your phone is enough. Look at trichomes on the flowers (not on the leaves). The ideal harvest point for most hybrid varieties is around 80-90% milky with a few amber tops. For a more Sativa-leaning profile harvest slightly earlier (90-100% milky); for more Indica effect slightly later (30-50% amber).
How to prevent harvesting wrong
Check trichomes daily from week 7 of flowering, and not just on one flower — sample different parts of the plant. Do not rely on pistils (the white/orange "hairs") as the sole indicator: they may already be fully orange while trichomes are not ready.
How to correct it
Once cut, a too-early plant cannot continue growing. What can be done: optimise the cure process (see mistake 10) to extract the best from what you have. Too-late harvested is permanent damage — learn from it for the next grow.
Mistake 8: Poor hygiene — underestimating pests and mould
A grow space is an ideal habitat for pests: warm, humid, no natural predators, concentrated leaf mass. Spider mites, thrips, whiteflies and aphids can destroy a healthy grow within weeks. Moulds — chiefly grey mould (Botrytis) and powdery mildew — strike when hygiene and air circulation fall short.
How to spot it
Spider mites: small white spots on leaves, fine webs on the underside. Thrips: silvery streaks or spots on leaves. Botrytis: brown-grey powder on flowers, often from the heart of the bud outward. Powdery mildew: white powder on leaves resembling sprinkled flour.
How to prevent it
- Fully clean your grow space between grows with a hydrogen peroxide or bleach solution
- Wash hands and change clothes before entering the grow space (especially after working in a garden or with other plants)
- Quarantine new plants or clones for at least two weeks before they enter the main grow space
- Use yellow sticky paper to detect early pests
- Manage air circulation and RH strictly (see mistakes 5 and 6)
How to fix it
At early detection, biological agents are often enough: predatory mites against spider mites, neem oil against multiple pests (only in veg phase), Bacillus thuringiensis against caterpillars. Chemical pesticides are a last resort and must not be used in late flower. At large-scale mould infection in flower a partial loss is often unavoidable — cut affected parts away and harvest the healthy parts early.
Mistake 9: Wrong pot size or poor transplant timing
The pot is more than a container — it determines how much root mass the plant can build and therefore how much top growth it can sustain. A too-small pot constrains the plant; a too-large pot makes watering imprecise and hard to manage. Poor transplant timing — transplanting too early or too late — can stress the plant unnecessarily.
Guidelines per phase
- Seedling: 0.5 L pot (jiffy or small pot)
- Early veg: 2-4 L pot
- Late veg: 7-11 L pot
- Flower / final pot: 11-25 L depending on plant size and grow style
When to transplant
The right moment to repot: when roots start to appear at the bottom of the pot through drainage holes (early root-bound stage), or when above-ground growth stagnates despite correct nutrition. Do not transplant earlier — a too-roomy pot slows root development.
How to avoid transplant damage
Always transplant in the evening or early morning, never in full light period. Keep old substrate around the roots and plant at the same depth. Give the plant 24-48 hours of mild stress reduction (lower light intensity, no feeding) before resuming the normal regime.
Pro-tip: Fabric pots do something special: when a root reaches the pot wall, exposure to air causes natural "air-pruning" — it stops and branches. The result is a denser root network without the typical "root-bound" pot shape. For serious yields, fabric pots are one of the most cost-effective upgrades.
Mistake 10: Underestimating drying and curing
The harvest is cut — and now what? Many growers treat the drying and curing phase as an afterthought, but this phase can make the difference between good and top-quality final product. Drying too fast gives a grassy product with harsh taste; no or poor curing results in a rough, unbalanced end product.
Correct drying conditions
- Temperature: 18-21°C
- RH: 55-65%
- Duration: 10-14 days (varies with bud thickness)
- Light: complete darkness
- Air circulation: gentle, indirect
Correct curing procedure
After drying, package tops in airtight glass jars (mason jars) at 60-70% fill. The first week, open the jars 2-3 times daily for 10-15 minutes ("burping") to release moisture and gases. After that, burp once daily or less, for 2-4 weeks total cure. Connoisseurs go up to 6-12 weeks for maximum development of flavour and effect.
How to spot a good cure
Cured product snaps softly but is not bone-dry, smells complex and not "green", and burns cleanly without the harshness of fresh product. Poorly dried product smells of hay or freshly cut grass — that is chlorophyll that has not broken down.
Pro-tip: For the experienced: hygrometers in every cure jar continuously show RH. For long-term storage (3+ months) Boveda packs (humidity-control sachets) keep RH within 58-62% without daily attention.
Honourable mentions: four smaller but common mistakes
The ten above cover the bulk of failed grows. Four smaller but common slip-ups worth deliberately avoiding:
- Poor genetics: a grow with cheap or dubious seeds starts at a handicap. Invest in reliable cultivars from a stable seed bank — see our cannabis seed buying guide for the key points.
- No grow log: without written records of feeding, pH, EC, RH and temperature, every grow is a new guess. A simple paper or digital log makes clear within two grows what works for your setup.
- Too aggressive topping or training: techniques like topping, FIM, LST and mainlining work — but applied too early or too often, they stress the plant needlessly. Start with one technique per grow and build up.
- Switching to flower (12/12) too early: flipping a too-small plant produces a proportionally small harvest. Let veg phase continue until the plant is at least 30-40 cm tall for the best ratio of grow time to yield.
Quick reference: setup checklist for prevention
A short checklist for those wanting to set up everything correctly from the start:
| Parameter |
Veg phase |
Flower phase |
| Light (PPFD) |
400-600 μmol/m²/s, 18h/day |
700-1000 μmol/m²/s, 12h/day |
| Temperature |
23-27°C day |
20-26°C day |
| RH |
55-65% |
40-50% |
| pH (soil) |
6.0-6.5 |
6.0-6.8 |
| EC |
0.8-1.4 |
1.4-2.2 |
| Watering |
When top 2-3 cm is dry |
Same, more often due to larger plants |
What to do if you have already made a mistake
A grow rarely fails from a single mistake — usually from a combination. When you spot a symptom, run this priority order:
- Check pH of incoming water and run-off. Half of all "nutrient problems" are pH issues, not deficiencies.
- Check VPD (temperature + RH together). Many symptoms resolve by correcting climate before touching nutrients.
- Check watering. When was the last time? Does the substrate feel dry or wet?
- Check light. Too close? Too far? Wrong phase for the cycle?
- Only then adjust nutrients — after the first four are in order.
The order matters: adjusting nutrients while pH or climate are off solves nothing and adds a variable to an already complex system.
Further reading
For those who now master the basics and want to go deeper:
Why Next Level Smart?
- More than 10 years of experience in cannabis genetics and growing know-how for Dutch and European customers
- Inner Earth Seeds range — our own curated varieties across feminized, autoflower, CBD and hybrid
- EU-wide shipping — seeds ship legally within the EU
- Extensive growing guides — our indoor and outdoor cultivation blogs together form a complete learning path
- Discreet shipping across the Netherlands and throughout Europe
Frequently asked questions about cannabis growing mistakes
What is the most common mistake beginner cannabis growers make?
Overwatering — giving too much water too often. It feels caring but it suffocates the root system by displacing oxygen around the roots. The symptoms look like drought damage (limp, yellow leaves) which tempts many beginners to give more water. The fingertip test — only water when the top 2-3 cm of the substrate is dry — fully prevents this.
How do I know my plant has been overwatered?
Three signs together point to it: limp or drooping leaves, yellowing starting from the bottom, and a substrate that clearly feels moist or wet. The difference with drought damage is in the substrate — under overwatering it is wet, under drought it is dry. In severe overwatering you sometimes hear or smell a brown-grey mould odour from the pot.
What is the ideal pH for growing cannabis?
It depends on your medium. For soil-based growing, pH 6.0 to 6.8 is the ideal range, with a sweet spot around 6.3-6.5. For coco the range is pH 5.8-6.2; for hydroponics 5.5-6.1. Outside these ranges nutrient lockout looms — the plant cannot take up nutrients even when they are present in the substrate.
What is VPD and why does it matter?
VPD (Vapor Pressure Deficit) is a quantity that describes how strongly the air "pulls" water out of the plant — a function of temperature and relative humidity together. Too low VPD slows transpiration and promotes mould; too high VPD stresses the plant and closes its stomata. For cannabis, the optimal VPD lies between 0.8 and 1.4 kPa depending on growth phase. A digital thermo-hygrometer and a VPD chart are enough to manage this well.
When is cannabis ready to harvest?
You determine the harvest moment by looking at trichomes — the small glass-like beads on the flowers. View them with a USB microscope or loupe. Clear trichomes are still immature. Milky-white trichomes mark peak THC and are the classic harvest moment. Amber trichomes indicate THC breakdown to CBN, giving a more "couchlock" profile. Most hybrid varieties are harvested at around 80-90% milky with a few amber tops.
How do I prevent mould during flowering?
Mould — especially Botrytis (grey mould) — needs two conditions: stagnant air and high humidity. Prevent it by keeping RH in late flower strictly below 50%, by continuous air circulation with oscillating fans (also under the plant), and by lightly defoliating dense buds preventively so air can reach everywhere. At early detection: immediately cut affected parts with sterilised shears.
What is the difference between overwatering and nutrient lockout?
With overwatering the roots themselves are the problem (no oxygen, possible root rot). With nutrient lockout the roots are healthy but pH is out of range and the plant cannot absorb nutrients. Both produce yellow leaves and slow growth, but the fix differs: overwatering you solve with less water and better drainage; lockout you solve with pH correction and a flush.
What is drying and curing, and why does it matter?
Drying is the first phase after harvest: 10-14 days hanging upside-down at 18-21°C and 55-65% RH in complete darkness. Curing is the next phase: storing dried tops in airtight glass jars and regularly "burping" them (opening for air exchange) for 2-4 weeks or longer. These phases break down chlorophyll and develop flavour and the full cannabinoid profile. Poorly dried or uncured product has a harsh hay-like taste.
What pot size should I use?
Start small and transplant as the plant grows. Seedling in 0.5 L pot, early veg in 2-4 L, late veg in 7-11 L, and final flower pot between 11 and 25 L depending on plant size. Fabric pots typically outperform plastic by aerating the roots and causing air-pruning — which results in a denser, more productive root network.
How long does a full grow take?
Seed to harvest typically 3 to 5 months for regular varieties, depending on strain and grow style. Veg phase typically 4-8 weeks at 18 hours light, flowering 7-10 weeks at 12 hours light. Autoflower varieties are faster (8-12 weeks total) but generally yield less per plant. After that comes 10-14 days drying and 2-4 weeks curing for the best end product.
Which cannabis seeds are suitable for beginners?
Beginners do well to start with feminized or autoflower varieties from a reliable seed bank — feminized guarantees female plants (the desired type for flowers), autoflowers forgive grow mistakes better through their robust genetics. Classics like Critical Feminized, Critical Auto and Bubblegum from our Inner Earth Seeds range are widely chosen by beginners.
What do I do if I have already made a mistake?
First diagnose in the right order: pH, VPD (climate), watering, light, then nutrients. Half of what looks like a nutrient problem is actually a pH or climate problem. A quick correction of the underlying cause is always more effective than blindly adding more nutrients. Document what you change and when — that is how you learn for the next grow.
Disclaimer: This blog is purely educational and covers cannabis cultivation technique for jurisdictions in which home growing is legally permitted. Cannabis seeds are sold only as a collectable item or for use in jurisdictions where home cultivation is legally permitted. Consult local regulations before germinating seeds.
Last update: June 2026 | Next Level Smart